Various stock Puch ignitions explained
Puch mopeds were originally delivered with several ignition systems, including Bosch, Iskra and Ducati. Most original contact breaker ignition systems work in a very similar way, but the correct flywheel, base plate and rotation direction are important.
In this guide, we explain which ignition type fits which Puch engine, the difference between left- and right-turning flywheels, how a contact breaker ignition is built, and how to set the ignition timing correctly.
Which stock Puch ignitions are there?
Original Puch mopeds were delivered with three well-known ignition types: Bosch, Iskra and Ducati. These ignition systems work in almost the same way. The main differences are the manufacturer, the exact part design and the type of contact points or condenser used.
When fitting ignition parts, it is important that the flywheel and base plate belong together as one matching set. Do not simply mix a random flywheel with a random base plate without first checking the type, fitment and rotation direction.
| Ignition type | Commonly found on | Important when fitting | Pay attention to |
|---|---|---|---|
| Bosch | Many original Puch models | Use the flywheel and base plate as a matching set | Check the contact point and condenser type |
| Iskra | Various Puch models and versions | Mounting holes are similar to other original types | Individual parts can vary by version |
| Ducati | Some Puch models and versions | Always check if the flywheel belongs to the base plate | Do not randomly mix with Bosch or Iskra parts |
Left- or right-turning flywheel: what does your Puch need?
The rotation direction of the flywheel is one of the most important things to check when choosing a Puch ignition. The wrong flywheel can prevent the ignition from working correctly or make the timing impossible to set properly.
| Puch type | Engine type | Flywheel rotation | Correct use |
|---|---|---|---|
| Automatic models | For example E50 | Right-turning | Use only with a right-turning ignition set |
| Models with gears | For example MV, VS and DS | Left-turning | Use only with a left-turning ignition set |
Always check carefully before ordering or fitting a flywheel. First confirm whether your engine is an automatic model or a geared model. Then check whether the ignition requires a left- or right-turning flywheel.
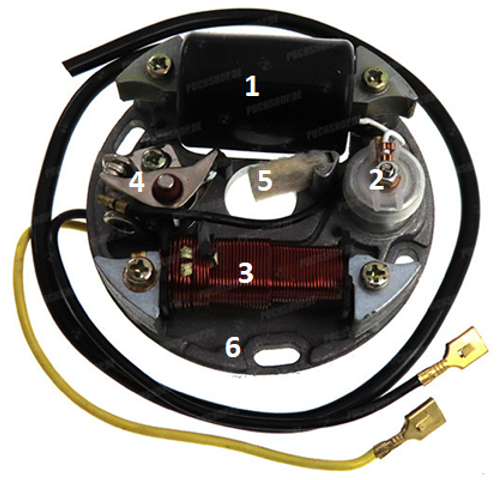
Parts of an original contact breaker ignition
Below you can see an original contact breaker ignition. This ignition consists of several parts that work together to create the correct ignition timing and a strong spark at the spark plug.
| Number | Part | Function | Common check |
|---|---|---|---|
| 1 | Ignition coil | Generates the current needed to create a spark | Check the ignition cable, spark plug cap and spark strength |
| 2 | Condenser | Helps build voltage and reduces excessive sparking at the contact points | Replace if the spark is weak, the engine runs poorly or the points burn quickly |
| 3 | Lighting coil | Supplies power for the moped lighting | Check the wiring and yellow power wire |
| 4 | Contact points | Open and close to determine the ignition timing | Set the contact point gap to 0.35 mm |
| 5 | Felt pad | Runs over the flywheel cam and helps keep the cam clean | Check that the felt is present and not worn out |
| 6 | Base plate | Holds all ignition components and is used to adjust timing | Rotate the plate to set the ignition earlier or later |
How to set a Puch contact breaker ignition
Correct ignition timing is important for starting, idling, acceleration, top speed and the life of the cylinder and piston. If the ignition is too early or too late, the engine can run poorly, become too hot or lose power.
Tools needed for adjustment
- Caliper or micrometer suitable for the spark plug hole
- Spark plug wrench
- Feeler gauge
- Flat and Phillips screwdriver
Basic settings for Puch contact points
| Part / setting | Adjustment | When to use it |
|---|---|---|
| Contact point gap | 0.35 mm | Basic setting for original contact breaker ignition |
| Ignition advance for standard 49cc cylinder | 1.1 mm before TDC | For original or standard setups |
| Ignition advance for 50cc fast / 70cc or larger | 1.4 mm before TDC | For faster or tuned setups |
Checking ignition timing with a strobe light
A strobe light, also called a timing light or induction timing lamp, lets you check whether the ignition actually sparks at the correct moment while the engine is running. This is more accurate than only setting the ignition statically with a caliper or micrometer.
Extra tools needed
- Strobe light or induction timing lamp
- 12 volt battery for the lamp
- Timing marks on the flywheel and crankcase
This method works for original contact breaker ignitions, but it can also be used with many electronic ignitions such as MVT, HPI and Kokusan. Always check the manufacturer instructions when setting an aftermarket electronic ignition.
Back to topTroubleshooting Puch ignition problems
A contact breaker ignition has several parts that can wear out or fail. If your Puch starts badly, has no power or has no spark at all, start with the simple checks before replacing the complete ignition.
Symptoms of a badly adjusted or faulty ignition
- The engine stutters while riding
- The engine does not rev properly
- The engine gets excessively hot
- The engine is difficult to start
- The engine does not idle
- There is no spark
- The spark is weak or irregular
What should you check first?
| Problem | Possible cause | First check |
|---|---|---|
| No spark | Faulty spark plug, spark plug cap, ignition cable, condenser or coil | Check the spark directly from the ignition cable |
| Stuttering or not revving properly | Ignition timing is too early or too late | Check the contact point gap and ignition advance |
| Difficult starting | Weak spark or incorrect timing | Check the spark plug, condenser and contact points |
| Contact points burn quickly | The condenser is not working correctly | Replace the condenser and check the ground connection |
FAQ: Puch ignition setup and troubleshooting
Which ignition does my Puch have?
This depends on the model, engine type and version. Many original Puch mopeds use Bosch, Iskra or Ducati contact breaker ignitions. Always check the flywheel, base plate and rotation direction before ordering parts.
What is the difference between a left- and right-turning flywheel?
A right-turning flywheel is normally used on automatic models such as the E50 engine. A left-turning flywheel is normally used on Puch models with gears, such as MV, VS and DS. These two versions are not simply interchangeable.
What should the contact point gap be?
For an original Puch contact breaker ignition, the contact point gap is usually set to 0.35 mm. Measure this with a feeler gauge when the rubbing block is on the highest point of the flywheel cam.
How many millimetres before top dead centre should I set my Puch ignition?
For a standard 49cc cylinder, 1.1 mm before top dead centre is commonly used. For a 50cc fast, 70cc or larger setup, 1.4 mm before top dead centre is often used. Always check the specifications of your parts for special setups.
Why does my Puch have no spark?
No spark can be caused by a faulty spark plug, spark plug cap, ignition cable, condenser, ignition coil, contact points or incorrect adjustment. First test the spark directly from the ignition cable and then work through the ignition step by step.